In this post we will have a quick look at how we can use Terraform to deploy Azure Data Factory into our Azure subscription and setup GitHub integration for source control. One of the main reasons that I tend to select Terraform over Bicep for much of my platform engineering is that there is a vibrant provider ecosystem which means I can interact with additional technology. In this case we will be using the GitHub provider to spin up the repo as part of the deployment without needing to provision it manually ahead of time, or write custom code to use the API to include it in the automated process.
Resources
You can find the Terraform project that is used in this post in my resource repository here.
The Deployment Project
As mentioned earlier, we are going to look at provisioning a basic Azure Data Factory and GitHub Repository which will then be integrated so that we can start building pipelines.
The Providers
We will start by setting up the providers we need to deploy the resources we need. In this case we are going to need the azurerm and github providers from the Terraform registry. In the example below we are specifying that we need the two providers listed, we are also specifying the version information for each. I prefer to set static versions rather than minimum as I can include the updated version in a subsequent release for more control.
 1terraform {
 2  required_providers {
 3    azurerm = {
 4      source = "hashicorp/azurerm"
 5      ## https://github.com/terraform-providers/terraform-provider-azurerm/blob/master/CHANGELOG.md
 6      version = "3.95.0"
 7    }
 8
 9    github = {
10      source  = "integrations/github"
11      version = "6.0"
12    }
13  }
14}
15
16provider "azurerm" {
17  ## Using AZ CLI Login for this scenario, add client, tenant, and subscription details here if needed.
18  features {
19  }
20}
21
22provider "github" {
23  token = var.githubPAT
24}
In this example I am developing locally for the examples so am using AZ CLI for the authentication context for the azurerm provider. In the case of GitHub I will use a Personal Access Token (PAT) which I will provide at runtime for the plan/apply/destroy phases.
GitHub Resources
As we want to setup our ADF deployment with source control integration we will need a Git repository to use. In this example I will be using GitHub as the source control platform of choice, it is also possible to use Azure DevOps and I will cover that in another post.
We are going to define three resources for this repository setup.
The repository resource is the main item we are creating, this will contain the branches and code for our projects. In the example below I am going to also look at having the facility to enable issues and wiki within the repository. Generally, I will enable these capabilities as it means that I can track bugs and features to manage the development workload using issues as well as create documentation using the wiki.
1resource "github_repository" "ghAdfRepo" {
2  name        = var.githubAdfRepoName
3  description = var.githubAdfRepoDescription
4  visibility  = var.githubAdfRepoVisibility
5  has_issues  = var.githubAdfRepoHasIssues
6  has_wiki    = var.githubAdfRepoHasWiki
7  auto_init   = var.githubAdfRepoAutoInit
8}
As part of the repository setup I want to create and set the default branch which will be used by the team members as a shared branch to push code to from their feature branches. When we define the Terraform resources for this we need to create the ‘main’ branch then set it as the default for the repository. This process can be seen in the Terraform resource definitions below.
1resource "github_branch" "main" {
2  repository = github_repository.ghAdfRepo.name
3  branch     = var.githubAdfRepoDefaultBranchName
4}
5
6resource "github_branch_default" "ghAdfRepoBranchDefaultName" {
7  repository = github_repository.ghAdfRepo.name
8  branch     = github_branch.main.branch
9}
By using references between the resources we can set an order of precedence for deployment to ensure that they are deployed in the correct order without needing to explicitly set dependencies.
Azure Data Factory
Now we can define the ADF resource definition for the project, we will need to deploy a resource group and a Data Factory.
As can be seen below we are automating the naming of the two resources using the technique I describe in my blog post ‘Automating Resource Naming with Terraform Locals’. Beyond that the main elements are the location where we will be deploying our resources.
 1resource "azurerm_resource_group" "rgDeployment-1" {
 2  name     = join("-", [local.azPrefix.resource_group, local.baseName])
 3  location = var.azureRegion
 4}
 5
 6resource "azurerm_data_factory" "adfDeployment-1" {
 7  name                = join("-", [local.azPrefix.azure_data_factory, local.baseName])
 8  location            = azurerm_resource_group.rgDeployment-1.location
 9  resource_group_name = azurerm_resource_group.rgDeployment-1.name
10  github_configuration {
11    account_name       = var.githubAccountName
12    branch_name        = github_branch_default.ghAdfRepoBranchDefaultName.branch
13    repository_name    = github_repository.ghAdfRepo.name
14    root_folder        = var.adfRepoRootFolder
15    publishing_enabled = var.adfAutoPublishingEnabled
16  }
17}
Within the GitHub configuration block in the ADF resource definition we have two attributes where we can reference the GitHuB repo we have defined earlier, this will ensure that it is created before the ADF resource. We then need to pass in three variables for information which we will define as needed for the deployment. The account_name and root_folder are mandatory and the publishing_enabled attribute is optional but I like to include it by default for the versatility it gives. In this latter case I make use of a default in the variable to set it to False but we can override it as needed.
Outputs
Finally we can use the output capability of Terraform to make our lives a little easier by getting the project to output the URL for the GitHub repository to the command line once the apply process is complete.
1output "GitHubRepoURL" {
2  value = github_repository.ghAdfRepo.html_url
3}
Here we are just telling it to get the relevant property from the resource once it has been deployed.
Deploying It All
Now that we have created our project we need to initialise the Terraform project with Terraform init. Then we can set the variables in our tfvars answer file then run our plan and/or apply activity. I tend to prefer to run a plan to make sure that it is going to do what I want it to before I run an apply.
 1terraform plan --var-file="./vars/example.tfvars"
 2
 3Terraform used the selected providers to generate the following execution plan. Resource actions are
 4indicated with the following symbols:
 5  + create
 6
 7Terraform will perform the following actions:
 8
 9  # azurerm_data_factory.adfDeployment-1 will be created
10  + resource "azurerm_data_factory" "adfDeployment-1" {
11      + id                     = (known after apply)
12      + location               = "uksouth"
13      + name                   = "rg-blog-dev-uksouth-1"
14      + public_network_enabled = true
15      + resource_group_name    = "rg-blog-dev-uksouth-1"
16
17... <<Trucnated output for brevity>>
18
19Plan: 5 to add, 0 to change, 0 to destroy.
Once we have reviewed the plan then we can run Terraform apply and confirm that we want the resources deployed.
Finalising The Deployment
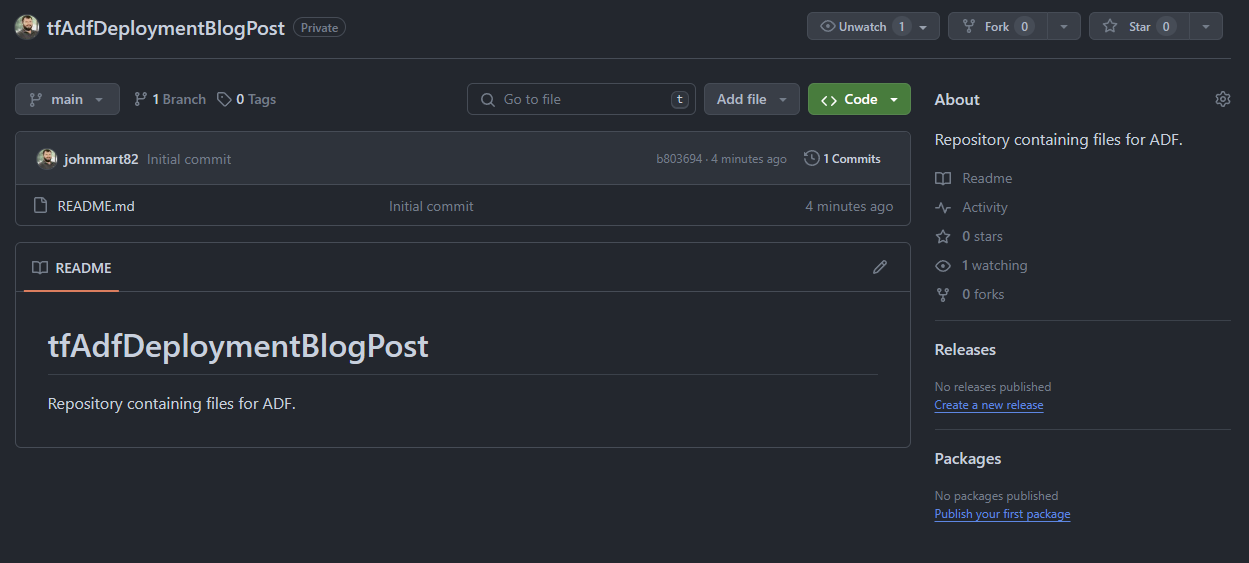
First of all let’s check that we deployed the repository to GitHub. We can either login to GitHub and manually find it, alternatively we can use the URL which was output from the Terraform apply process which we defined in our outputs.
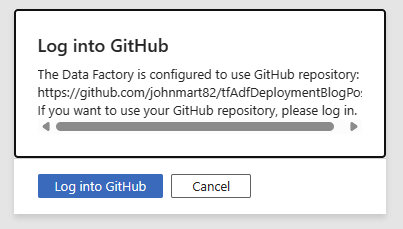
Now we can open the Azure portal and then login to the Azure Data Factory Studio. Upon first login we will be prompted to authenticate to GitHub to finalise the integration.
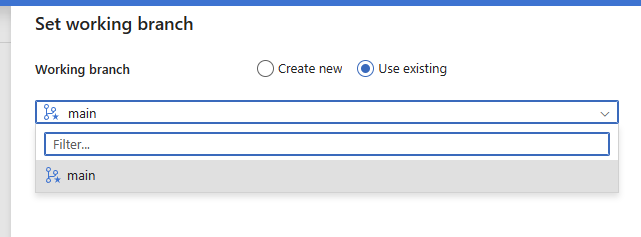
Once this has been done, close and re-open the studio, then we should be prompted to pick our default branch for working with in studio. From here I will select main as I will create feature branches as needed for the work I and the team need to complete. The main branch will be where we merge all of our work into rather than have a shared working branch.
Once this is done, we are all set to start development of our pipelines.
Summary
Here we have taken a quick look at how we can use Terraform to deploy not only the Azure cloud resources but also GitHub repository, hopefully demonstrating some of the versatility of the tool. From here we can build upon the resources defined and deployed to build up a more comprehensive deployment which also includes elements such as azure storage, private networking, and data factory elements such as linked services. I will look to cover these in subsequent posts over the coming weeks.
I hope that this has helped show you some of what we can do and give you the foundation for pushing on with your own Infrastructure as Code automation journey with Azure data platform technology.
Thanks for your time.
/JQ
comments powered by Disqus