Another trip into the T-SQL Tuesday archive today, this time taking a look at the topic of IO which was originally posted by Mike Walsh back in March 2010.
Thinking back over my history of working with database systems, and SQL Server in particular, there have been numerous IO related things to tinker with and solve. However, the topic that I will cover in this post is running SQL Server data files on Azure blob storage.
Why would you want to do such a thing? One scenario I have encountered, which we will look at here, is an online archive of very infrequently used data within the database. For this we will look at how to setup the connectivity from SQL Server to Azure blob storage, then setting up a filegroup and files on the remote storage, before then creating the database objects to house the data.
Resources
All of the script files for this post can be found in my public GitHub repository which is located here.
What does this look like?
In this scenario we will simulate an on-premises SQL Server instance connecting to the remote storage via the public endpoints for the storage account. I’m going to use a local docker container on my laptop but the fundamentals of this configuration will be the same if using an instance on a server.
Now for the disclaimer, this is not intended to represent a production configuration. If you do want to go down this route then I would strongly recommend the use of private endpoints and networking for the connectivity to the Azure blob storage. I will look to cover this in a subsequent blog post and will update this with the link once I get that published.
At a high level there are only a few steps which you need to do in order to allow SQL Server to connect to Azure blob storage to create and store files there.
- Create an Azure Blob Storage account and create a container for the files.
- Generate a Shared Access Signature which can be used by SQL Server to connect to the container.
- Create a credential in SQL Server which has all of the information needed to connect to the blob storage container.
- Create a file and file group within your database which has files in the blob storage container.
- Create tables on the file group where you want the data stored in the remote blob storage.
As with anything, there are nuances to the way that the blob storage account is setup and that will be in line with your security policies, this post will focus on the how rather than the details of what can and cannot be done for security, performance, etc. One thing to note is that storage account names need to be all lowercase alphanumeric and globally unique.
Setting up Azure Blob Storage
The first step is to setup a storage account in your Azure subscription. I’ll cover the key tasks here in the post but the full Azure CLI script can be found here. The script below will create the Azure Resource Group, Storage Account, and a container in our subscription.
1# Create resource group, storage account, and create a container.
2az group create --name rg-tsqltue-io --location uksouth
3az storage account create --name sttsqltueio --resource-group rg-tsqltue-io
4az storage container create --name sqlserverarchive --account-name sttsqltueio --auth-mode login
Once that is in place we will need to generate our SAS which will be used to connect to the container by our SQL Server instance, this is done with the following Azure CLI command. for the purposes of this post I set a one day lifespan for the SAS token, you will need to set one up according to the requirements which you have for lifecycle and key rotation.
1# Generate SAS token.
2az storage account generate-sas --expiry $expiryDateTime --services b --resource-types sco --permissions cdlruwap --account-name sttsqltueio --https-only --account-key $AZURE_STORAGE_KEY
We will also need the primary blob endpoint for this account as when we create the credential in SQL Server we will need to use this as part of the credential name. We can get this using the following Azure CLI command.
1# Get the primary blob endpoint from storage account.
2az storage account show --resource-group rg-tsqltue-io --name sttsqltueio --query 'primaryEndpoints.blob'
Now that we have this we are ready to move over to the SQL Server and get things setup there.
Setting up SQL Server.
I’m using a docker container on my laptop but this will work just as well with a full blown instance in an operating system such as Windows or Linux. I’m using the latest SQL Server 2022 image on Ubuntu. The following will pull the container image and then start a container called sql22 then check it is up and running with the Docker PS command. Also, just to note I am running docker in WSL2 and my commands are passed in via the WSL Ubuntu interface in Windows Terminal.
 1# Pull down the latest SQL 2022 container image.
 2sudo docker pull mcr.microsoft.com/mssql/server:2022-latest
 3
 4## Run the container
 5sudo docker run -e "ACCEPT_EULA=Y" -e "MSSQL_SA_PASSWORD=<!Your Password Here!>" \
 6   -p 1433:1433 --name sql22 --hostname sql22 \
 7   -d \
 8   mcr.microsoft.com/mssql/server:2022-latest
 9
10## Check container is running
11docker ps
Now that we have a SQL Server instance to use we need to setup the credential which the instance will use to connect to Azure blob storage with. In order to create this credential we will need the following pieces of information from when we created the storage account.
- Primary Blob endpoint URL.
- Storage container name.
- SAS Token we generated.
When creating the credential the name of the object is a concatenation of the Primary Blob Endpoint URL and the storage container name which was created earlier. Additionally, we need to specify that the identity is “SHARED ACCESS SIGNATURE” and then provide the SAS token we generated using Azure CLI earlier. This gives us the following statement which we can run in SQL Server.
1CREATE CREDENTIAL [https://sttsqltueio.blob.core.windows.net/sqlserverarchive]
2    WITH
3        IDENTITY = 'SHARED ACCESS SIGNATURE',
4        SECRET = '<Your generated SAS Token>'
5;
6GO
I have already setup a database called MyAppDb within my SQL Server instance which has a single primary file group and a log file. With this in mind lets start by setting up a table which contains some test data. As mentioned earlier this technique works well on infrequently accessed data which we want to archive, as such our table is setup so that we can archive data based on year. The script below will setup the table and populate it with some example data.
 1-- Switch context to new database.
 2USE MyAppDb;
 3GO
 4
 5-- create a small table, insert some data, then query it.
 6CREATE TABLE dbo.myDataTable
 7(
 8    recId INT IDENTITY(1,1) PRIMARY KEY,
 9    dataValue VARCHAR(15) DEFAULT(REPLICATE('12345',3)),
10    recYear INT
11)
12;
13GO
14
15INSERT INTO dbo.myDataTable(dataValue,recYear)
16    VALUES(DEFAULT,2024);
17GO 500
18INSERT INTO dbo.myDataTable(dataValue,recYear)
19    VALUES(DEFAULT,2023);
20GO 2500
21INSERT INTO dbo.myDataTable(dataValue,recYear)
22    VALUES(DEFAULT,2022);
23GO 1500
24INSERT INTO dbo.myDataTable(dataValue,recYear)
25    VALUES(DEFAULT,2021);
26GO 500
27
28
29SELECT * FROM dbo.myDataTable;
30GO
We are working under the premise that we will archive data at the end of a year and move data from the main data table into the archive table. There are several potential variations on this where you could have a single table per-year etc. but that is up to you. Before we create our table we need to setup our archive filegroup which will dictate where our data is stored physically. This is achieved by using the standard process for adding a filegroup and then additional files as can be seen in the SQL statements below.
 1-- Create new filegroup for our archive then add some files to it on the Azure blob storage.
 2USE master;
 3GO
 4
 5ALTER DATABASE myAppDb
 6    ADD FILEGROUP cloudArchive;
 7GO
 8
 9ALTER DATABASE myAppDb
10    ADD FILE
11    (
12        NAME = cloudArchive1,
13        FILENAME = 'https://sttsqltueio.blob.core.windows.net/sqlserverarchive/cloudarchive1.ndf',
14        SIZE = 50MB,
15        MAXSIZE = 100MB,
16        FILEGROWTH = 5MB
17    ),
18    (
19        NAME = cloudArchive2,
20        FILENAME = 'https://sttsqltueio.blob.core.windows.net/sqlserverarchive/cloudarchive2.ndf',
21        SIZE = 50MB,
22        MAXSIZE = 100MB,
23        FILEGROWTH = 5MB
24    ),
25    (
26        NAME = cloudArchive3,
27        FILENAME = 'https://sttsqltueio.blob.core.windows.net/sqlserverarchive/cloudarchive3.ndf',
28        SIZE = 50MB,
29        MAXSIZE = 100MB,
30        FILEGROWTH = 5MB
31    ),
32    (
33        NAME = cloudArchive4,
34        FILENAME = 'https://sttsqltueio.blob.core.windows.net/sqlserverarchive/cloudarchive4.ndf',
35        SIZE = 50MB,
36        MAXSIZE = 100MB,
37        FILEGROWTH = 5MB
38    )
39    TO FILEGROUP cloudArchive;
40GO
As you can see when we specify the location of the files we use the full URL path to the Azure blob storage container. Based on the path specified here SQL Server will select the appropriate credential to use for the file access.
Now we can create our archive table with the same structure as the main data table on the new file group which is backed by Azure storage. Once we have created we can transfer the data for some of our old years into the archive table.
 1CREATE TABLE dbo.myDataArchive
 2(
 3    recId INT PRIMARY KEY,
 4    dataValue VARCHAR(15),
 5    recYear INT
 6)
 7ON [cloudArchive]
 8;
 9GO
10
11-- Archive data for 2021 and 2022 then add check constraints to tables.
12BEGIN TRANSACTION archiveData;
13
14    INSERT INTO dbo.myDataArchive(recId, dataValue, recYear)
15    SELECT recId, dataValue, recYear FROM dbo.myDataTable WHERE recYear IN (2021,2022);
16
17    DELETE FROM dbo.myDataTable WHERE recYear IN (2021,2022);
18
19COMMIT TRANSACTION
20GO
21
22--Check rows counts per-table.
23SELECT COUNT(*) AS countRows, 'myDataTable' AS tableName FROM dbo.myDataTable
24UNION
25SELECT COUNT(*), 'myDataArchive' FROM dbo.myDataArchive
26;
27GO
Now that we have transferred data from the live data table to the archive we can select data from them as needed. However, if we want to see a consolidated view of the data contained then we should look to create a view over the top of the tables. Below we are going to create a view called myDataView which will union the data from the two tables into a single object which we can query.
1-- Create a view to show consolidated data output.
2CREATE VIEW dbo.myDataView
3AS
4    SELECT recId, dataValue, recYear FROM dbo.myDataTable
5    UNION ALL
6    SELECT recId, dataValue, recYear FROM dbo.myDataArchive
7;
8GO
So, now that we have this all in place we are done… Well, yes and no.
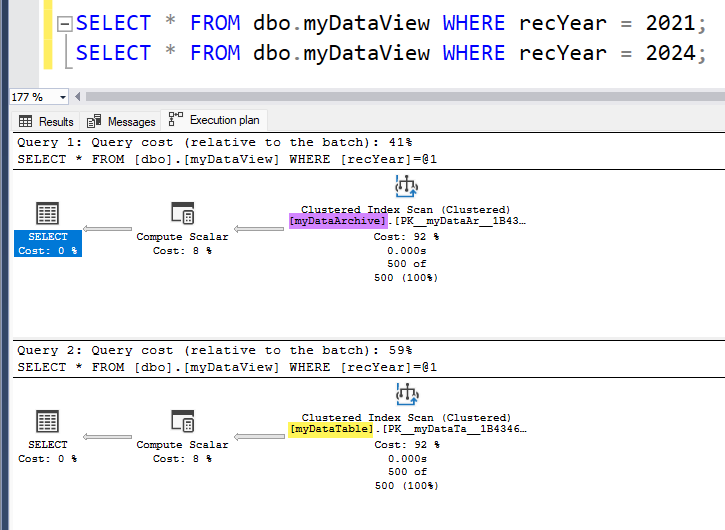
One of the issues with this is that if we query the view we are going to query both tables to get our data back, even if we apply a filter based on the year that we want to see. If we turn on actual execution plan capture, we will see that for each of the statements below that while data resides in either the remote or the local one depending on the filter and the other table returns nothing. While the IO for that remote table access is really small it is unnecessary.

We can get around this by adding check constraints to the two tables on the year column which set the boundary for the data which is contained within them. This means that when we query the view SQL Server will know whether it is worth querying the table under the view based on the predicate provided for year. This capability is referred to as a partitioned view, for more information I strongly recommend checking out this post by Eric Darling where he explains it really well, the post is hosted by Brent Ozar on his blog.
So if we use the following statements then we can add the check constraints needed to eliminate the extra table access.
1-- Add check constraints to table in order to allow us to leverage partitioned views.
2ALTER TABLE dbo.myDataTable
3 ADD CONSTRAINT checkRecYear_current CHECK(recYear >= 2023)
4;
5
6ALTER TABLE dbo.myDataArchive
7 ADD CONSTRAINT checkRecYear_archive CHECK(recYear < 2023)
8;
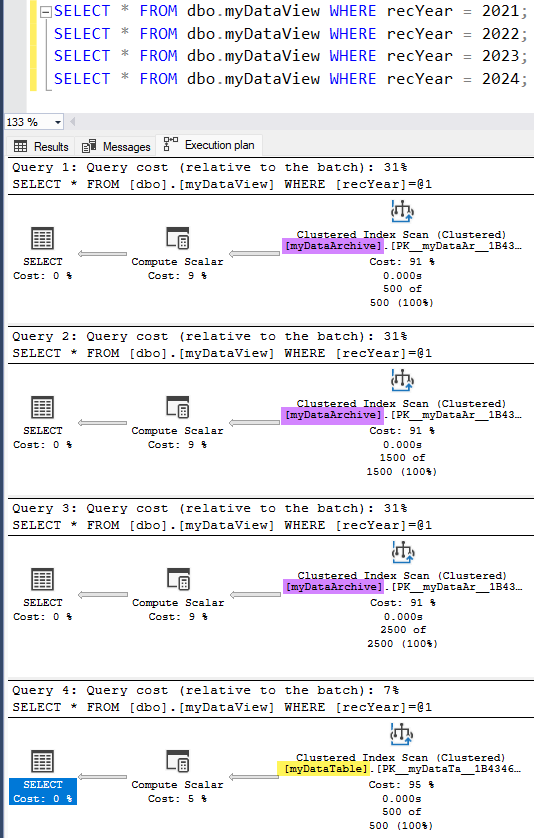
9GONow if we run our queries again we can see that SQL Server will only go to the table where the data exists.
One thing to consider here is that if we archive additional data from the local table then we will need to update the check constraints accordingly, so we need to make that part of the process we implement. This is illustrated in the code snippet below.
 1-- Now lets archive the data for 2023 to azure blob storage based table.
 2BEGIN TRANSACTION archiveData;
 3
 4    ALTER TABLE dbo.myDataTable
 5        DROP CONSTRAINT checkRecYear_current
 6    ;
 7
 8    ALTER TABLE dbo.myDataArchive
 9        DROP CONSTRAINT checkRecYear_archive
10    ;
11
12    INSERT INTO dbo.myDataArchive(recId, dataValue, recYear)
13    SELECT recId, dataValue, recYear FROM dbo.myDataTable WHERE recYear IN (2023);
14
15    DELETE FROM dbo.myDataTable WHERE recYear IN (2023);
16
17    ALTER TABLE dbo.myDataTable
18        ADD CONSTRAINT checkRecYear_current CHECK(recYear >= 2024)
19    ;
20
21    ALTER TABLE dbo.myDataArchive
22        ADD CONSTRAINT checkRecYear_archive CHECK(recYear < 2024)
23    ;
24
25COMMIT TRANSACTION
26GO
If we now query each year we can see which table is serving the data through the view.
Summary
Thanks for following along so far, I hope that you found this an interesting little journey through a feature which is not heavily used in SQL Server. I find it an interesting approach and feature which has a few potential use cases which I will be blogging about in the near future, so check back every now and then if you are interested in seeing what I am thinking.
One thing to note is that I doubt that I would implement this for an on-premises based SQL Server unless I was able to ensure that data would not be inadvertently queried. There are the latency and bandwidth considerations to take into account, but the one which really concerns me is data egress costs. There is the potential to end up with a hefty Azure bill if the remote data got queried a lot and pulled down to the SQL Server. I would probably be far happier to look at this were my SQL Server instance running in the same Azure region as my Azure Storage account as this would minimise the egress cost risk.
Thanks for reading, hope to have you visit again some time.
/JQ
-
Previous
Tales from the T-SQL Tuesday Archive: #012 Why are DBA Skills Necessary -
Next
Tales from the T-SQL Tuesday Archive: #019 - Disaster Recovery